Can't connect my printer
Steps:
- To connect the printer to the iPad, go to 'Settings' on the iPad, select 'Bluetooth,' and turn 'ON' Bluetooth by toggling the switch.
- On the rear of the printer, hold the 'Pair' button for 5 seconds or until you see the green LED blinking, then release.
- Please note: If the light is purple, then turn the printer OFF. Hold the 'Feed' button down and turn 'ON' the printer. Wait to let go of the 'Feed' button until you hear the printer start to print. On the printout look for 'Auto Connection.' This should read 'OFF' for 'Current Setting.' If it’s 'ON,' then repeat this step until you see 'Auto Connection' read 'OFF.'
- Once the green light is blinking, you should see 'Star Micronics' appear on the iPad screen underneath the Bluetooth toggle switch.
- Select 'Star Micronics' on the iPad. The printer should be connected to the iPad. If this fails, repeat Step 2.
- Once you have connected the printer, you can rename the printer to be more unique to your station, e.g. Printer 1. Make sure the printer says 'Connected on Bluetooth' in the 'Settings' app. Press the 'i' icon. At the top, click on the 'Name' field. You can rename the printer here. Please note that the name change is only recognized on the device that it was created.
Printer won't print
If the printer won't print, there are a few options to get the printer working.
- Check if Printer is Still Connected
- Ensure that the printer is still connected to the iPad. Go to 'Settings.' Under 'Bluetooth,' make sure that Bluetooth is 'ON' and that the printer is still 'Connected.' If it says 'Unconnected,' then tap on the field to reconnect it.
- Restart Bluetooth Connection
- Toggle the Bluetooth connection 'OFF' and 'ON' again. Press the pairing button until you see a flashing green light, then reconnect.
- Hard Refresh the Showpass App
- Double press the 'Home' button on the iPad to get into app selection mode. Swipe away the Showpass app in order to hard reset the app. Open the app and try to connect the printer again. Run a test print with an existing transaction to see if its prints.
- Forget and Reconnect Printer
- Select the 'i' icon next to the the name of the printer under 'Settings' > 'Bluetooth.' Select 'Forget Printer.' Now try put the printer back into pairing mode by holding down the 'Pair' button on the rear of the printer and reselect the printer to connect it.
- Factory Reset
- Turn the printer around and, using a pin or another sharp object, insert it into the hole marked 'RST' until you start to hear printer noise. This should erase any cache data and reset the print to factory settings.
- Turn the printer around and, using a pin or another sharp object, insert it into the hole marked 'RST' until you start to hear printer noise. This should erase any cache data and reset the print to factory settings.
Flashing Red Light/ Paper Jam
Sometimes the red light on the front of the printer may flash. The common issue is that the paper was installed incorrectly.
To fix this issue, open the printer using the lever on the side to reveal the paper.
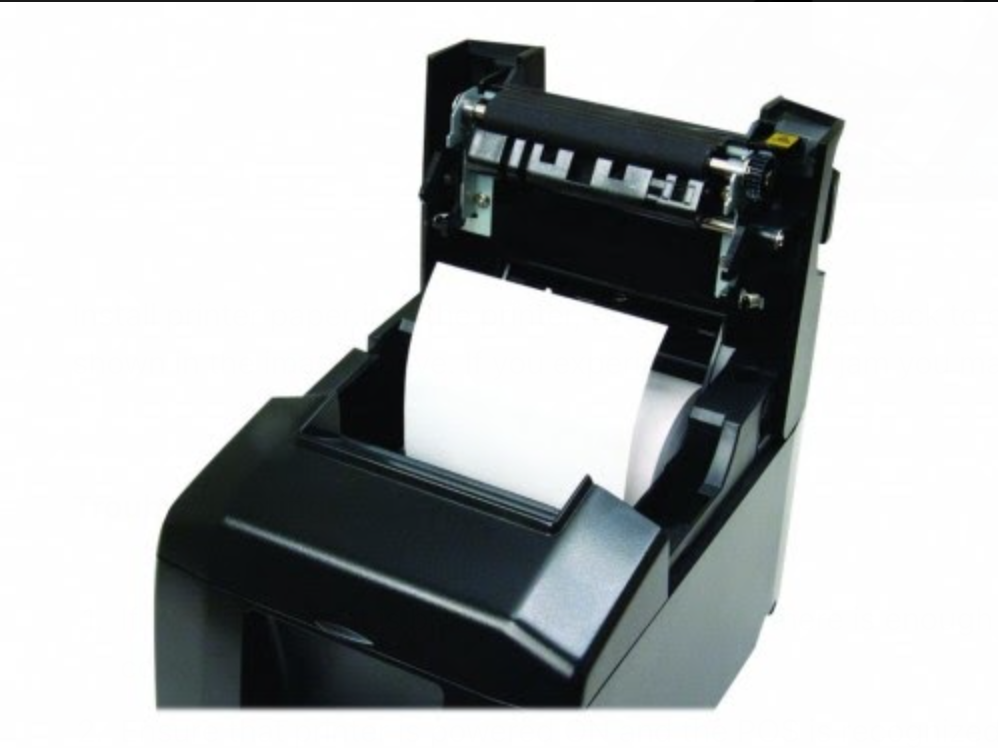
Once opened, ensure that the paper is tightly spooled and that the orientation is like the image above.
Close the printer and then the red light should disappear.
Factory Reset
If you are struggling to connect the printer to a iPad, then you may need to perform a factory reset.

Firstly, you should 'Forget The Device' on the iPad. Go to the 'Settings' app on the iPad and select 'Bluetooth.' Next to the unconnected device, press the 'i icon and then press 'Forget This Device.'
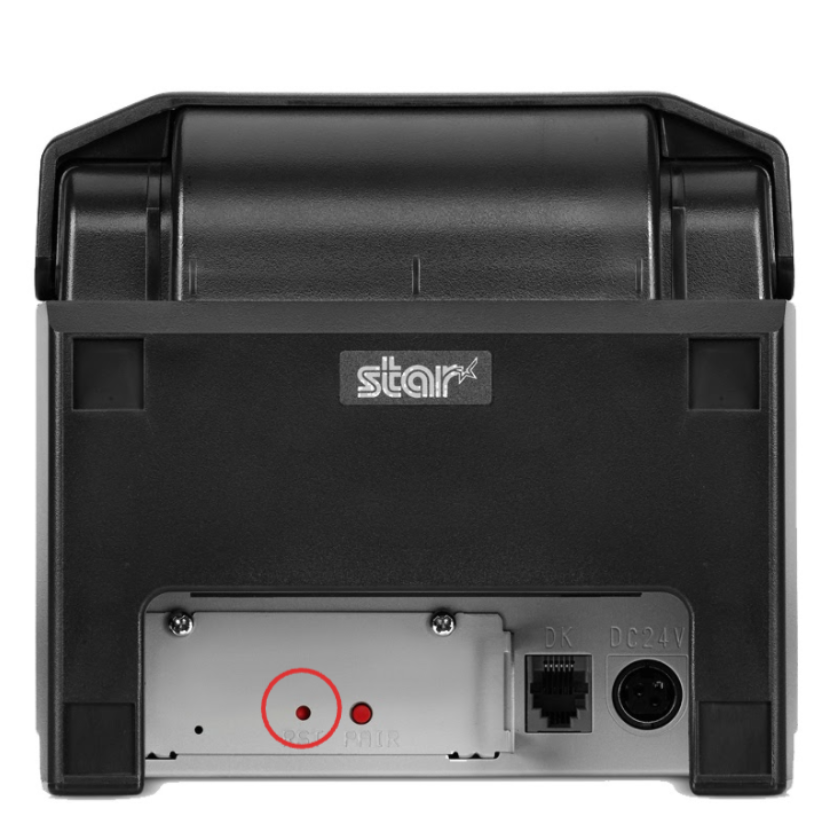
Turn the printer around and, using a pin or another sharp object, insert it into the hole marked 'RST' until you start to hear printer noise. This should erase any cache data and reset the print to factory settings.
After you have performed these steps you should be able to re pair the printer and iPad.